Portfolio Guide Reflection
1. State the assignment (problem/project) in your own words.
During this design challenge, we are to design, build, and program (control by keyboard) a robot that is able to rescue a hidden water bottle. Someone will hide the bottle somewhere where we physically will not be able to see. The way that we will be able to see the robot is by a camera that is going to be attached to it. By looking at the tv that shows what the robot is seeing, we are to use the controller to navigate our robot to the water bottle. To make this challenge even more difficult, the water bottle will be filled half way with water.
2. What are your input factors? (What do you need to know or do before you can begin?) Include the research you did.
Before beginning the project, it would be helpful to understand the basics about building a tetrix structure. Also to build the crane part it would be helpful to understand the basics of putting together the legos into a stable structure. If you go into the challenge with prior use and knowledge of using a controller would also be an advantage in moving along quicker through the designing process.
http://www.youtube.com/watch?v=j5UQsjX3PX8
http://www.youtube.com/watch?v=m9OHuhR8hQQ
http://www.youtube.com/watch?v=qYbEsNs0ZiI
3. Describe the process in detail. Explain the steps you followed in order to complete the project.
To start this challenge, we began by designing a robot that had two tetrix motors and 2 NXT motors. The tetrix motors were to be used to move the actual robot while the NXT motors were to be used to navigate the claw. After finishing creating, building, and wiring our robot, we moved to using LabView to create a program that would be used by our computer keyboard. Before being able to pursue this new program, we had to fix our schematic editor by adding in it that was on our robot. Once this was done, we had a working robot. From this we were able to attach the camera and begin the actual challenge. The water bottle was hidden, and we were able to control our robot to find the water bottle and successfully bring it back to the starting point.
4. Describe the final output / product in detail: (what are we looking at?)
The ending product was able to navigate using the bluetooth, as it is being controlled by our computer keyboard. As we see where our robot is by the tv in our room and camera on our robot, is how we are able to control the robot to find the hiding water bottle. We were able to do this succussfully, by grabbing the water bottle with the claw that we had created, and drag it back to our room, then releasing the bottle.
5. Describe feedback you received during the project (suggestions, comments, etc). From peers, instructor ect.. How did you use this feedback to correct issues with your project?
We received a good amount of feedback during this project. First, we were advised to switch the direction that we were placing our wheels. This way our robot would be long and skinny instead of wide and shorter. Another suggestion that we recieved from our teacher was to charge the battery to fix the problem of our motors not working. This did in fact resolve the problem. Another peer suggestion had to do with the design on our claw. We had change our design so that the motors were not working on the same rod, which was counterproductive when moving our claw. With this we made something that resembles two half claws, that when used together was successful.
6. What did you learn during the assignment such as tools, skills, design concepts, software, hardware, etc?
During this assignment, I learned how to use both tetrix motors as well as NXT motors on the same robot design. We had not done something like this prior to this assignment. Another simple thing that we learned was a much easier way to attach our NXT to our robot using the round gray attachments that came with the tetrix kit. Before realizing this new way, our NXT was never very stable on our robot. This new way of attaching it will help on every assignment after this one.
7. If you were to do the project again, what would you do differently and why? Provide reasons and examples
If I were to do this project again, I would try to figure out how to create an even better claw design. Going along with the project, I never really thought our design was very well put together or stable. Although our design was just enough to get the challenge done, it probably would not have worked for anything long term. This is what I would want to focus on if given this challenge again. Also, because I would have more knowledge and experience with working with these objects (the NXT kit) more the second time around.
Our Robot (:
The Claw (1st attempt)
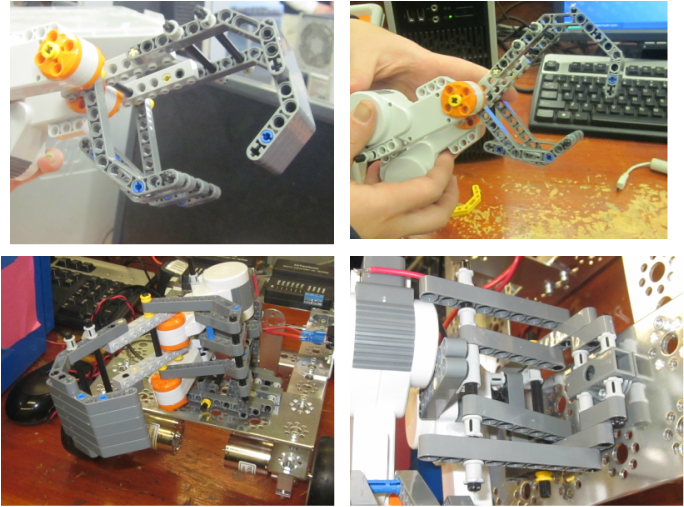
This is the claw that we built to pick up the water bottle in the challenge. We decided to build it out of the NXT lego kit. By using this kit, we made it so there are two seperate motors working on the same claw, but operating seperate portions of it. When attaching it to our robot was when we had the most problems. Our first attempt was not very stable, although we kept building onto this idea until the design became successful.
The Claw (2nd attempt)
This is our second claw design. Our first design didn't work because the motors were attached to the same rod, which counteracted the movement of each NXT motor. To fix this we made the claw so it was like two seperate half claws, when combined to work together are successful.
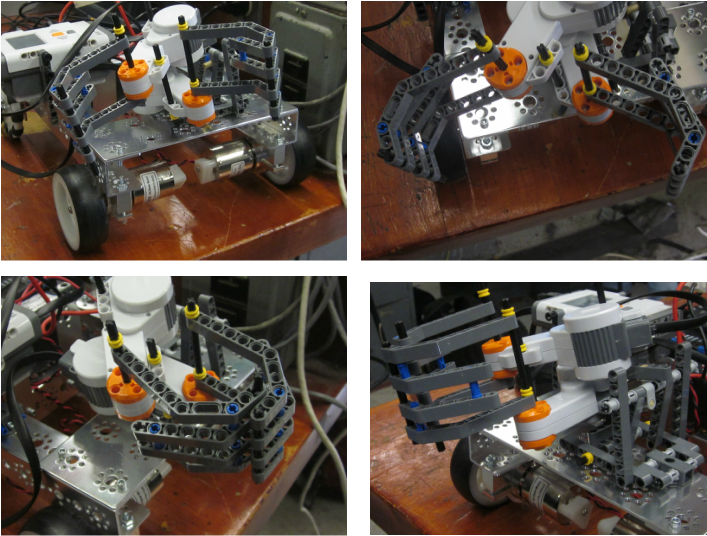
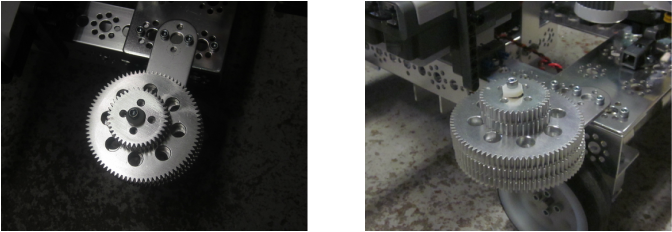
Base and battery

The base of our robot is very simple. All we needed for this challenge was a strong base, without any extra sensors. For this reason we decided we would just keep the design simple to make it easier for us. Although after finishing the initial structure, we noticed that not all the wheels were touching the ground. We decided to add weight to the back of our robot to fix this, which is how we came up with the idea of creating this ledge for the battery to rest on. Although, our battery created a lot of issues during this challenge. It was not fully charged by the time we were testing our motors, so after a lot of trial and error, we came to the conclusion that we had to charge it. After we had done this, our battery and motor problems were resolved.
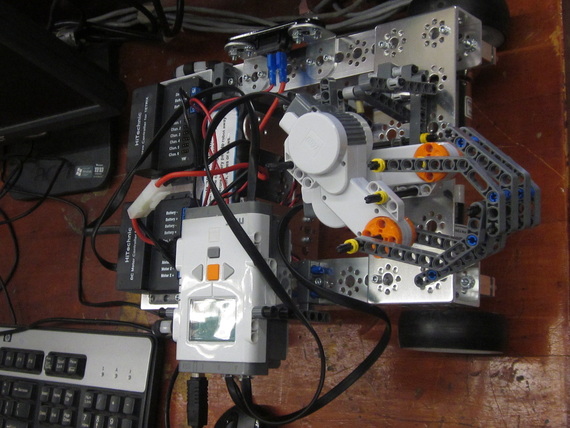
Wires and attachments
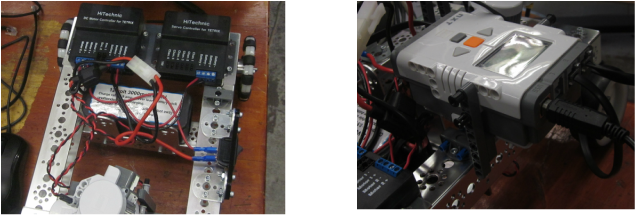
Besides the NXT claw used in this assignment, we also had to add the NXT programmer, motor controllers, wires, and the battery in a way that would work with our design. We created a seperate ledge to put our battery on to get it out of the way. We had extra room where we attached our motor controllers. Then using the only room we had left, we put our NXT programmer off the side with a stable structure. When we wired the robot, we rested these on the battery so they wouldn't drag on the ground.
Adding weight
When we started to test our robot using the bluetooth, we were not able to make it move straight. After trial and error, as well as watching our robot while trying the keys, we noticed the motor was moving but didn't have enough traction with the ground in order to move. We fixed this by adding weight onto that side of the robot, which fixed the problem, allowing our robot to move in a straight line when working with the other motor at the same time.
Schematic Editor
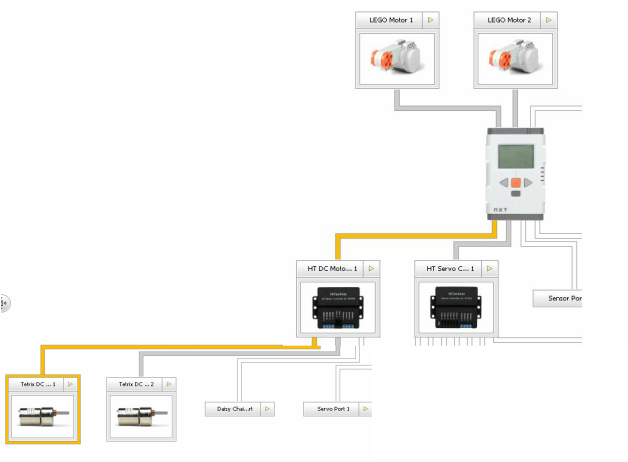
This diagram of our schematic editor shows that the two motor controllers are connected to the NXT programmer by port 1. The wires off of the NXT programmer show that connected to port A is a motor, as well as a motor connected to port B. Then, connected to the motor controllers are both of our tetrix motors. The features on this image tell the program what our robot design consists of, which then can be controlled by either a program or keyboard controller. It also allows us to test out any motor if something isn't working right.
How to control it...

We initially were going to control our robot with a controller similiar to the one shown in the first picture. Although, since this broke we had to work around this and instead use the keyboard, shown in the second picture.
